Troubleshoot roomba not working error in easy steps
The only reason why users choose the iRobot Roomba is it makes the boring and tedious house cleaning tasks easy. Giving users much respite from the hassle of handling the cleaning tasks manually, the iRobot Roomba robot is everyone’s best companion. However, sometimes, the robot may face setbacks in terms of hardware or software failures. This may force users to look for information online to troubleshoot issues. This is why the team has compiled helpful information on this page so you can resolve Roomba Not Working like errors in no time.
Tackling stubborn issues in iRobot Roomba
Battery backup related issues
Some of the most common issues that users face while using their Roomba robots are related to the battery. Although it is with every machine that at some point of time, the battery fails to hold the charge for long, you can always follow some tips to keep the battery at its best. Here are some tips you can keep in mind for the next time you face issues dealing with iRobot Roomba:
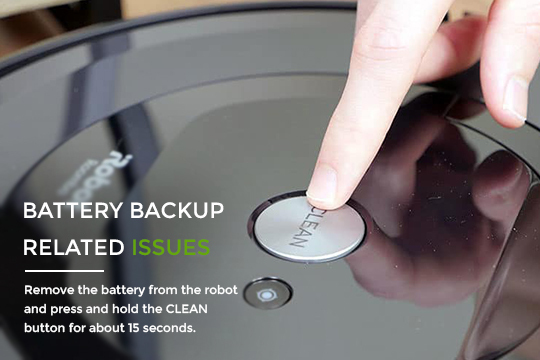
- Remove the battery from the robot and press and hold the CLEAN button for about 15 seconds.
- The robot will now enter the state of reboot. Allow it to be in this state for about a minute or two.
- Replace the battery, keep the robot on charge until the power indicator light turns solid green.(The LED colour may be different in different models of the roomba robot.)
- Once it does, allow the robot to charge to the full without any interruptions.
- You can repeat these steps till you see some progress in the battery backup. If following these steps doesn’t help, you can purchase a new battery.
AdVanced issues need advanced troubleshooting strategies
While you can easily resolve battery backup issues by following the steps discussed in the previous section, there are a host of other issues you might need help with. Petty issues like the motor opening being entangled by pet hair or textile fibre or the vacuum suction mouth clogged by debris, can affect your robot’s performance severely. While you can always resolve the issue by cleaning the openings using compressed air, tackling complicated issues will need advanced troubleshooting methods. Below is a look at some additional issues you might face and how to resolve them effortlessly.
1. Roomba won’t charge/dock
If you find Roomba not returning to the dock for a charge once the cleaning cycle is over or incomplete, it is obvious that there’s some issue with the same. Here are some steps you can follow to resolve Roomba won’t charge error:
- Check the charger line cable and see if there is any damage to the same. Replace the same if you find any signs of wear and tear.
- Plug in the charger to a power socket and make sure the power indicator lights are solid green. This color might differ as per the Roomba model you own.
- Plug in the charger cable to the home base securely. Verify if the power indicator is flickering every 4 seconds. This isn’t an indication of some error, rather a method to conserve energy.
- Ensure that there are no virtual wall/lighthouses or a second home base within at least 8ft. of the home base that might interfere with the main home base-robot communication.
- Keep the main home base in an open location that’s easily accessible and not congested.
- Clean the charging contacts on both the home base and the Roomba using a dry cloth to clean off any debris.
- Try to dock Roomba manually by pressing the DOCK button on the home base.
2. Roomba not working at all/ Roomba won’t turn on
If you have just unpacked your robot and it doesn’t power on, check if the battery is displaced during the transit. Simply remove the battery from its location and plug it back in the battery compartment securely. For robot models that have been installed previously, you can follow the troubleshooting steps as mentioned:
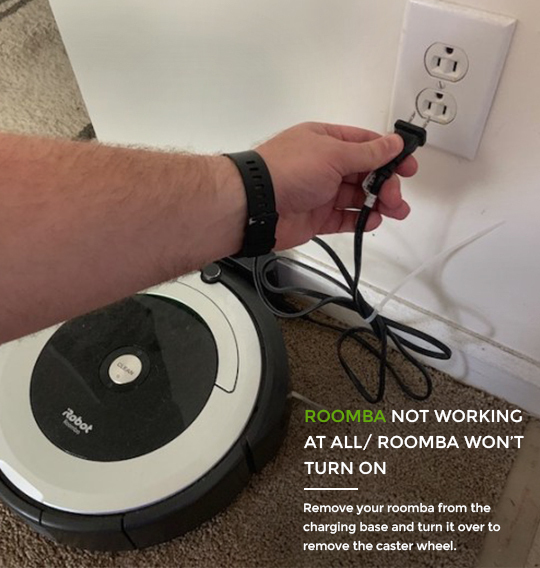
- Plug the home base to the power outlet and turn on the power supply. See if the power LED is going on and off every 4 seconds. If it doesn’t use some other power outlet to power your robot. Also, inspect the power cables for damage.
- In case the light on the home base lights up but the robot isn’t charging, check to see if there is debris on the charging contacts. Clean the same using a dry cloth.
- Remove your roomba from the charging base and turn it over to remove the caster wheel. Inspect if there is any debris stuck to it. Clean the same if any.
- Place the robot on the home base, and charge it for at least one hour. If the troubleshooting indicator begins to flicker and an error message or tone is heard, check the error message chart as discussed in the next section and take steps accordingly.
- Additional reasons for issues might be related to the wrong type of battery being used or problems with the power source you are connecting your Roomba to. Check to see if this is the case and resolve the same accordingly.
3. Error Codes
If there arises a problem with Roomba, you will hear a ‘uh-oh’ message and a troubleshooting light will flicker. The number of times it blinks tells a lot about the error you are facing. The device will also speak out the error code. Based on the error code that you har, you can follow the troubleshooting steps as under:
Error Code 1
This error usually occurs when the base station and the battery cannot communicate well. If the yellow pull-tab hasn’t been disconnected before placing Roomba on the home base, it won’t charge. And since it won’t charge, it won’t operate correctly. You can eject the battery and reconnect it after removing the pull tab.
Error Code 2/3/5/8 & 9
These error codes indicate a problem either between the home base and the battery or the battery alone. Simply, unplug the robot from the power source, and clean the charging contacts using a dry cloth. You can then replace the robot on the home base.
Error Code 6 & 7
If the battery temperature on the Roomba is abnormal, it will refuse to charge. In case of high temperature, the error code 6 will be shown. For abnormally low temperatures, the error code 7 will be shown. To resolve the issue, you can disconnect your Roomba robot from the home base and allow it to rest for about half an hour at room temperature.
| Error Codes | Possible Issue | Troubleshooting steps |
| 1 | Battery | Clean battery charging contacts and reset roomba |
| 2 | Brushes | Clean the brushes |
| 3 | Stalling | Reset roomba and recharge it to the full |
| 5 | Charging | Disconnect the yellow pull-tab |
| 6 | Sensors | Clean the sensors on-board and reset roomba |
| 9 | Bumpers | Clean and reset roomba |
| 10 | Wheels | Clean the caster wheel |
| 11 | Geographical Issues | Remove obstacles, improve lighting and clean roomba |
Table1: Error Code Chart
4. Brush Not Spinning
If the side brush on your roomba S9+ vacuum robot or some other model doesn’t spin, here are some steps you can follow:
- Turn the robot to its side and unscrew the side brush.
- You’ll see the side brush motor and the blue colored housing in the chamber secured using three screws. Loosen the two bolts on the edges and take the motor out.
- Carefully take off one part of the housing so as not to damage the snap-latch. You’ll find some gears and a motor in one part of the housing and a metal axle with a wide gear in the other part.
- Clean any debris or obstructions that are preventing the motor from rotating freely. Lubricate the stuck gear using some WD90 standard oil. Once done, reassemble the equipment carefully.
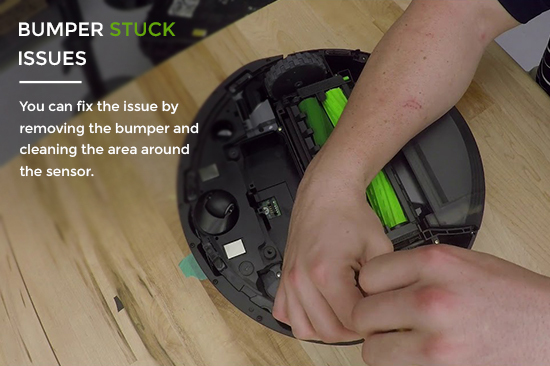
5. Bumper Stuck Issues
Your bumper sensor might trigger a false alarm due to debris on it. If lint or fibre like obstructions block the optical beam path, it will in turn block the light to the photodiode detector even if the bumper has not been zapped.
You can fix the issue by removing the bumper and cleaning the area around the sensor. Once done, power the Roomba back up.